Sunday, April 27, 2008

Several Martha Stewart Recipes

During the past few days I have tried my hand at several Martha Stewart recipes.


Very good and at least gave us the illusion that they are healthier than traditional bar wings. There were several left over, and although they still tasted good, they get a bit soggy in the fridge.


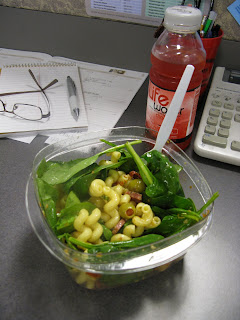
It was then on to Antipasto Salad (also from the May Everyday Food) for lunch at the office. I really enjoyed this as it was not only healthy but fast, perfect for a quick bite at my desk on a very busy Friday afternoon.


And last, but not least, was Chocolate Thumbprint cookies, http://www.marthastewart.com/recipe/chocolate-thumbprints?autonomy_kw=chocolate%20thumbprints&rsc=header_1, which I worked on this morning. I just tasted one and it was very good, however they are not yet totally set so I am not sure how well they will package.


Had fun with all of these recipes and will probably make all of them again.

Monday, April 21, 2008

A Chocolate Lover's Birthday

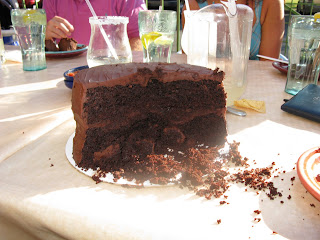
A few months ago Traci (a huge fan of chocolate) emailed me this recipe from epicurious.com for Double Chocolate Layer Cake, http://www.epicurious.com/services/referral?messageKey=7de3274fec3510bc1a0b16e35a12277e. She had seen it on the Today Show who was featuring it as the most searched chocolate cake recipe on the site and suggested that one of us make it some time soon. So I took the opportunity to make it for her birthday yesterday afternoon.


I could not find Callebaut chocolate at Whole Foods so I choose Scharffen Berger Semi Sweet instead. The cake came together easily, however I thought I had wax paper but it turned out I didn't, so I improvised and generously buttered the bottom of the pans. This however did make the cakes difficult to remove, next time I will for sure use the wax paper on the bottom as the recipe instructs.


The frosting was a bit difficult, it is a ganache, however the consistency at first was too liquidity, so I put it in the fridge and then it got too firm.....the flavor was good, however it did make it difficult to frost and to make it look pretty. Next time I think I may try a traditional butter cream.


Off we went to La Perilla Mexican Restaurant with cake in tow to celebrate Traci's big day, were we all had great food and cocktails out on the patio, it was such a beautiful day.


Traci & Presley (also a chocolate lover at the young age of almost 3) were eager to try the cake, which everyone raved about. The texture was very moist and the flavor excellent, but I can't seem to figure out why it became so crumbly......oh well, just another reason to try again.


Happy Birthday Traci, I hope it's a great year!

Tuesday, April 15, 2008

Stuffed Peppers from the Freezer

Another keeper! This was excellent and again came from The Best of America's Test Kitchen Special Edition magazine.

I have made stuffed peppers before and they have always been good, yet a little soggy after being drenched in tomato sauce. This recipe is not only easy but the pepper are roasted in the oven, rather than baked which I think makes the texture is much better.


Here are the peppers still frozen, ready for the oven.


Here they are after baking.....delicious! I can't wait to make them again!


Stuffed Peppers From the Freezer

Serves 4 to 6

1 tablespoon olive oil

1 onion, minced (about 1 cup)

8 ounces 85% lean ground beef or ground turkey

4 ounces hot or sweet Italian sausage, casings removed

salt & pepper

4 garlic cloves, minced

2 cups cooked rice

1 (14.5- ounce) can diced tomatoes, drained

4 ounces mozzarella cheese, shredded

1 ounce Parmesan cheese, grated

3 tablespoons chopped fresh parsley

4 red or green bell peppers, cut in half through the stem end (stem left intact), cored & seeded

For Serving

2 tablespoons olive oil

salt & pepper

4 ounces mozzarella cheese, shredded

For the peppers and stuffing: Heat the oil in a large skillet over medium heat until shimmering. Cook the onion until softened and beginning to brown, about 5 minutes. Increase the heat to medium-high and add the beef, sausage, 1/2 teaspoon salt, and 1/4 teaspoon pepper; cook, breaking the meat into small pieces with a wooden spoon, until the meat begins to brown, 6-8 minutes. Add the garlic and cook until fragrant, about 30 seconds. Drain the mixture in a colander for 1 minute.

Transfer the meat mixture to a bowl and mix with the rice, tomatoes, mozzarella, Parmesan, parsley, 1/2 teaspoon salt and 1/4 teaspoon pepper. Refrigerate until chilled, at least 20 minutes.

Spoon the filling evenly into the bell peppers. Wrap each pepper in 2 layers of plastic wrap and 1 layer of foil. Place in a baking dish and freeze until firm. Transfer to a zipper-lock plastic bag and freeze up to 2 months.

When ready to serve: Adjust an oven rack to the middle position and heat the oven to 450 degrees. Cut 8 pieces of foil large enough to just cover the stuffing and the peppers and spray with cooking spray. Unwrap the peppers and cover the filling sides with the new foil squares. Using a skewer, poke several holes through the foil. Place the peppers, foil side down, over the vents of a slotted broiler pan top set over a broiler pan bottom.

Brush the peppers with the olive oil and season with salt & pepper to taste. Bake until the peppers are spotty brown, 30-35 minutes. Flip the peppers filling side up, remove the foil, and sprinkle with mozzarella. Bake until the cheese is melted, about 5 minutes. Let rest of 5 minutes before serving.

Sunday, April 6, 2008

Delicous Sunday

Wow, we just ate the best meal I have created in months! I am so very proud of myself! :-)

We started with Italian Pot Roast a from Cook's Illustrated Special Edition magazine- Best Recipes and reviews 2008.


This recipe was delicious, comforting, and flavorful. I have made countless pot roasts in my day, but always in the Crock-Pot the way my mom always made it. This was my first go round with cooking a pot roast in the oven and it turned out beautifully, served over egg noodles.


Italian Pot Roast

Serves 4 to 6


1 boneless chuck-eye roast (3.5 - 4 pounds)

2 tablespoons vegetable oil

1 onion, chopped

1 celery rib, chopped

1 pound cremini or white mushrooms, quartered

2 tablespoons tomato paste

1 (14.5- ounce) can diced tomatoes

1/2 cup tomato sauce

2 teaspoons sugar

1/2 cup water

1 cup red wine

1 large garlic heat, outer papery skins removed, then halved

1 large sprig fresh thyme

1 sprig fresh rosemary


Adjust an oven rack to the middle position and heat oven to 300 degrees. Pat the roast dry with paper towels and season with salt & pepper.

Heat the oil in a Dutch oven over medium-high heat until just smoking. Brown the roast on all sides, 8 to 12 minutes. Transfer the roast to a large plate. Reduce the heat to medium and cook the onions, celery, mushrooms, and tomato past until the vegetables begin to soften, about 8 minutes. Add the diced tomatoes, tomato sauce, sugar, water, 1/2 of the wine, garlic and thyme. Return the roast and the accumulated juices to the pot and bring to a simmer over medium-high heat. Place a piece of foil over the pot, cover with the lid and transfer the pot to the oven.

Cook until the roast is just fork-tender, 2.5 to 3.5 hours, flipping the roast after 1 hour. Uncover the pot and let the roast rest in its juices for 30 minutes, skimming the surface fat after 20 minutes. Transfer the roast to a carving board and tent with foil. Remove and reserve the garlic head and skim the remaining fat from the pot. Add the remaining 1/2 cup wine to the pot, bring to a boil over medium-high heat, and cook until the sauced begins to thicken, about 12 minutes.

Meanwhile, carefully squeeze the garlic from the halves and mash into a paste. Add the rosemary to the pot and simmer until fragrant, about 2 minutes. Remove the rosemary and thyme springs, stir in the mashed garlic, and season the sauce with salt and pepper to taste.

Cut the meat against the grain into 1/2 inch thick slices, or pull it apart into large pieces. Place cooked egg noodles onto serving platter and top with meat and sauce.


For dessert, Blueberry Pie, YUMMY!!! It turned out excellent as well. I used the Basic Pie Dough from pg. 180 on Baking Illustrated. This is the same recipe I used for apple pie last weekend and it turned out wonderful again.


The filling was from pg. 444 of Martha Stewart Living Original Classics. The only modification made to the filling was I added the inside of one vanilla bean. I bought vanilla beans awhile back and have been trying to think of recipes to use them in before they get dry.


I will have to make blueberry pie again (what a tragedy) and try and figure out how to make the sauce a little bit thicker. It was rich and flavorful, but needs to be a bit thicker.


This was a fabulous Sunday! I cooked pretty much all day and enjoyed the spoils when it was all over, who could ask for more.

Saturday, April 5, 2008

A note about Chewy Molasses Cookies

I prepared the dough before going to bed last night and baked them off this morning. Much better! The dough was far easier to work with. Also, instead of baking 12 cookies per sheet I only baked 6 per sheet. This meant two batches needed to be baked but it was well worth it as the cookies still spread a lot. Flavor and texture are still fantastic, this one is a keeper.

Wednesday, April 2, 2008

Dinner in the Spring

I LOVE eating outside, I think it is one of the best joys in life. Tonight was beautiful again, we are hoping the weather sticks around through the weekend, but just in case it doesn't we took advantage of it tonight.

I grilled rib-eye steaks marinated in rosemary, lemon zest, lemon juice, Montreal steak seasoning, garlic and olive oil. Also grilled up some eggplant for me (more on eggplant later, I think I need to do some experimenting with it) and steamed green beans for Peter.


It was a great evening, just two more days to the weekend!!!

Chewy Molasses Cookies

On Monday night I got the fever to bake. I recently bought the new Martha Stewart Cookies book and decided to try a recipe from it.

1/2 Cup (1 stick) unsalted butter, room temperature
1 cup packed light brown sugar
1/2 cup granulated sugar, plus 1/4 cup for rolling
2 large eggs
1/2 cup unsulfered molasses
2 tablespoons vegetable oil
2 cups all-purpose flour
1 teaspoon baking soda
1 teaspoon ground cinnamon
1 teaspoon ground ginger
1 teaspoon ground allspice
1/2 teaspoon coarse salt


1. Put butter, brown sugar, and 1/2 cup granulated sugar in the bowl of an electric mixer fitted with the paddle attachment. Mix on medium speed until smooth, about 3 minutes. Mix in eggs one at a time, followed by the molasses and oil.

2. Reduce speed to low; gradually mix in flour, baking soda, cinnamon, ginger, allspice, and salt. Cover dough with plastic wrap; refrigerate until firm, about 1 hour or overnight.

3. Preheat oven to 325 degrees. Put remaining 1/4 cup granulated sugar in a bowl. Using a 1 3/4- inch ice cream scoop, form balls of dough. Roll balls in sugar to coat, and space 3 inches apart on baking sheets lined with parchment paper. Bake, rotating sheet halfway though, until cooks are flat and centers are set, about 17 minutes. Let cool completely on sheets on wire racks. Makes about 2 dozen cookies.


So.....what did this recipe teach me? To follow directions! Do not be impatient and only chill the dough for 45 minutes, you will get something that looks like this.


They all grew together and literally dripped off of the pan! The good news is that evening when the cookies first came out of the oven they were outrageously delicious! So good that even Peter didn't have one thing he thought could be improved upon, if you know Peter you know what a complement that is for me!


The next morning I packed the remaining cookies up to give to my friend Traci and a co-worker Lynette. Lynette said that they were awesome, had become crisp around the edges, but still chewy in the middle. I am still awaiting what Traci thought. I think I may give them another go this weekend to see if chilling overnight will make a difference in the way that they spread.

Cheddar- Dill Scones


On Sunday while Peter was at a photography workshop (see his work at www.flickr.com/photos/shizam1) I made Cheddar- Dill Scones which I had seen on a recent episode of Barefoot Contessa, one of my favorite Food Network shows.


Honestly, I can not remember the last time I had a scone, but I do have memories of them being very dense and filling. There we nothing like I remembered, they are light and flavorful and almost remind me of biscuits. I have been enjoying them for breakfast all week.


4 cups plus 1 tablespoon all-purpose flour, divided

2 tablespoons baking powder

2 teaspoons salt

3/4 pound cold unsalted butter, diced

4 extra-large eggs, beaten lightly

1 cup cold heavy cream

1/2 pound extra-sharp yellow Cheddar, small-diced

1 cup minced fresh dill

1 egg beaten with 1 tablespoon water or milk, for egg wash


Preheat the oven to 400 degrees F.


Combine 4 cups of flour, the baking powder, and salt in the bowl of an electric mixer fitted with a paddle attachment. Add the butter and mix on low speed until the butter is in pea-sized pieces. Mix the eggs and heavy cream and quickly add them to the flour-and-butter mixture. Combine until just blended. Toss together the Cheddar, dill, and 1 tablespoon of flour and add them to the dough. Mix until they are almost incorporated.


Dump the dough onto a well-floured surface and knead it for 1 minute, until the Cheddar and dill are well distributed. Roll the dough 3/4-inch thick. Cut into 4-inch squares and then in half diagonally to make triangles. Brush the tops with egg wash. Bake on a baking sheet lined with parchment paper for 20 to 25 minutes, until the outside is crusty and the inside is fully baked.